Where to begin?
- Oct 21, 2025
- 2 min read
Bike unloaded... tick
Parts boxed and categorised... tick
Where to start... hmmmm
The logical first step is to get the bike up on its centre stand and the swing arm installed... Is this the correct order? Who knows, but that's where I am starting.
The swing arm had new bushes installed so that was one less thing I needed to buy. After working out the parts and fasteners needed I decided to tackle that first. After battling with the swing arm bushes and getting the shocks bolted up it started to look like the start of a bike. I thought it would be a good idea to leave everything fingertight whilst I get things lined up and make sure everything fits as it should. I decided to purchase a bag of mixed fasteners of common sizes used on Bantams in a BSF thread as I wanted nice shiny clean fasteners... yes I really am that sad! Some of the threaded holes in the frame needed cleaning up from where some of the powder coating had blocked some of the threads. A quick pass with the correct size tap cleaned them up nicely.


The next bit to install was the center stand, and while the spacers were already fitted, the main tube that goes over the threaded rod was not. I measured up and just ordered some thick-walled aluminum tube, which I then cut to length. Making sure the spacers were in the right order was a little bit of a challenge, but by looking at schematics and reading old posts on the BSA Bantam Facebook page, I managed to confirm their order. If you are embarking on your own BSA Bantam restoration, then I highly recommend you join both the BSA Bantam Facebook page and the BSA Bantam Owners Club. Both resources have lots of information and knowledgeable members that really will make your restoration a lot easier. While the Haynes manual is useful, some of it is not 100% accurate.
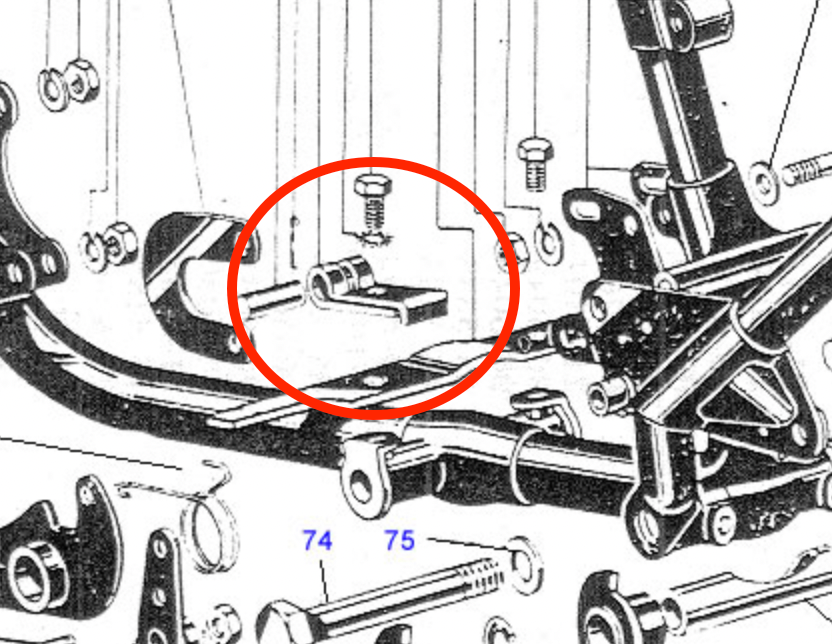
The center stand consists of a few parts, most of which were missing. The hardest part to source was the P clip (circled below), but I did finally manage to find a NOS one via the Bantam Facebook group, which, after cleaning up, will finish the center stand off. The pin that holds the horseshoe-shaped bracket was also missing, but I will make this myself on the lathe at a later date.
Eagle-eyed readers may notice that the rear brake pedal is bent. I will try to straighten this later on, but after heating the part, it will probably damage the powder coating. A second, straight one came with the bike, so once powder-coated, I will probably use this one.
Well, that's all for now! I will fit the footrest rubbers at a later date when the brake pedal has been powder-coated.


Comments